Showing posts with label Swaps. Show all posts

Wednesday, August 10, 2011

Imagine the Possibilities

100_3534 100_3530

     My upline held a group meeting last weekend.  I created this card for our group swap contest and, guess what….my swap card was voted as ‘best card’!  Woohoo!  It really did mean a lot to me because the mojo just hasn’t been present all that much lately.  It’s a super simple card that is easily mass produced.  The textured panel is DSP from the Paisley Petals package, adhered to scrap card stock and then run through the Big Shot using the Square Lattice Textured Embossing Folder.  Embossing the two together gives the DSP a lot more strength.  The image stamp is from Just Believe.  I stamped it in Certainly Celery and then colored the flowers in with Concord Crush and added some detail with my White Gel Pen.  The sentiment is from Word Play…again.  I’m really loving this sentiment!  The die cut butterflies were all left over bits from my Open House.  I love when I can use up the little bits and pieces.  The image panel is layered onto the beautiful new Wisteria Wonder and then all are mounted onto the card base using Dimensionals.  Yes, I stamped a little sweetness on the inside corner of the card and glued in a tiny butterfly.  :) 

     Thanks for stopping in today.  Mojo has a way creeping up on us.  Just go with the flow.  (Be ready Andrea…I’m wishing some your way)  :D

Hugs,

Leslee

Supplies are Stampin’ Up! and can be purchased here.

Wednesday, January 26, 2011

Vintage & Faux

100_2440

     Vintage is so popular at the moment.  My supplies certainly aren’t vintage on their own so it is only natural to incorporate faux into the project.  Okay, maybe a few supplies that I’ve been hoarding for like…forever.  (smile)  The Springtime Vintage Designer Series paper is so beautiful and elegant.  It really does scream “vintage”!  I’m so smitten with it…now there’s a vintage word.

100_2449     This card was created for a recent swap.  Though it looks labor intensive, it really is not.  The new Framed Tulips Textured Impressions Embossing folder is so elegant and frames your artwork so nicely.  A quick crank through the Big Shot and it’s done.  The faux suede flower is so easy to create.  You can see the technique in this post, How-To-Faux Suede.  I used the Scallop Circle and Boho Blossoms punches.  The ‘leaves’ were made with the 5-Petal Flower punch.  The flower is in Rose Red, leaves in Always Artichoke and all is held together with a Very Vanilla brad.  The Very Vanilla Taffeta ribbon was scrunched by pulling only one thread in the center.  I came across this technique on Mary Fish’s 1 Minute to Wow video tutorial.  You can check it out by clicking on this link, Simple Satin Scrunchy Ribbon.  The ribbon took the longest when creating these cards.  But once I got the hang of grasping only one thread to scrunch, it went very quickly.  I even impressed my hubby (that doesn’t happen often).  The stamp set I used is a new one found in the Occasions Mini, Thanks for Caring.  I just love this butterfly and had to have it!  He is stamped in Pear Pizzazz ink.  I ink distressed the image panel with Pear Pizzazz and the Distressing Essentials’ flat stamp.  This simply adds to the vintage feel of the card. 

100_2446

     I really like how the card turned out.  Hubby said it was the best I’ve ever done!  I’ll take that!  Though…what does he know? ;)

     Thanks for looking.  I hope you’ve been inspired!

Hugs,

Leslee

All supplies are Stampin’ Up! and can be purchased HERE.

Thursday, August 19, 2010

Scrapbook page - Elements of Style

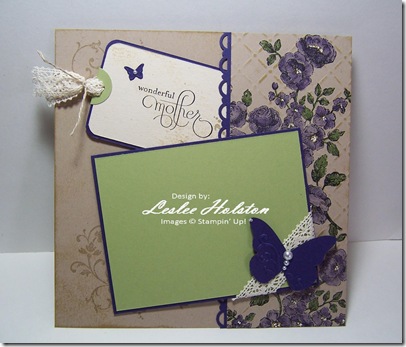
     I know I’ve been MIA for a few days.  I’ve been spending some much needed time with the family.  Friday, was our ‘Fun In The Sun’ party.  We all had a wonderful time.  The food and fellowship was simply great.  Such fun to get together during the week simply to get together :)  Then, Sunday, we all went fishing.  I love to see my boys catching fish!  Finally, Tuesday, I was able to attend my upline’s monthly meeting.  I don’t get the chance to go often with sports and family obligations.  It is about a 45 minute drive (providing the Bridge/Tunnel traffic isn’t backed up).  It was so nice to get to go.  Our swap this month was a 6 x 6 scrap page.  My page was the month of May.  This is was I came up with…
100_1396

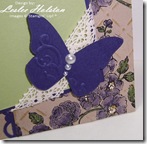
     I used the beautiful Elements of Style set.  This is such an elegant set that screams “vintage”.  Love the look.  The Crumb Cake base was distressed using the new Distressing Essentials and the Tea Stain Vintage Ink.  I simply inked up the rubber and rubbed it onto the card stock.  The flourish is stamped in Crumb Cake classic ink.  The panel on the right took the longest to do (I had twelve of these to do).  I stamped the floral image in Jet Black StazOn first.  Then I run it through the Big Shot using the Perfect Details Texturz plate.  I, again, distressed the raised embossing with the Tea Stain ink.  Finally, I colored the image with Pear Pizzazz and So Saffron marker and used my Blender Pen dipped in Concord Crush ink for a watercolored look.  Using the White Gel Pen, I gave the flower centers a little highlighting.  A strip of Concord Crush was punched with the Scallop Trim Border and adhered to the edge of the panel.  I applied SNAIL to the top, bottom and outside edge only.  Thus creating a pocket to hold the journaling tag.  I stamped one side with the mother sentiment from the Well Scripted set and left the back side blank for additional journaling.  My note:  I think that all pages need space for journaling.  Without it, the future generations aren’t going to know what, who, why, where or when about the photo on the page.  Originally, I colored and cut out twelve of the hummingbirds from the Elements of Style set only to decide that I didn’t like the element on 100_1395the page.  The little bird just got lost on the page.  So, I shifted gears and added the butterflies die cuts from the Beautiful Wings Embosslits die.  I added the Jewel – Basic Pearls for added interest.  I’m loving the Victoria a5/8” Crochet Trim!  It’s so vintage looking and fun!  Another note:  This seems like a very lengthy post.  There were just several steps to this page but none was difficult to do.  Like I said, the most time consuming thing was coloring the panel image in with the blender pen and classic ink pad.  This is one time that I actually wish I had the re-inker.  I think the process would have gone quicker.
     On a more solemn note, my dad was sent back to the hospital last week.  He was running an extremely high fever.  They ruled out that it had anything to do with his recent open heart surgery but they have not found the reason behind it all.  They finally sent him home Wednesday with antibiotics for the next ten days.  Please continue to keep him in your prayers.

     Thanks for visiting today.  I hope you’ve been inspired.  Leave me a comment and let me know what you think.  I love reading your comments.

Hugs,

~Leslee~

All supplies Stampin’ Up! and can be purchased HERE!    

Friday, July 24, 2009

Sweet Slice of Summer

Ah...summer is so sweet, isn't it? Cookouts with kids running wild, fresh veggie salads and sweet watermelon dripping down your chin! Does it get any better? I think not! We recently had one of these awesome and sweet summer days. And when I sat down to start my swap cards for an upline meeting, all I could think of is that I wished I had some more of that sweet watermelon! So...I grabbed my Circle Scissor Plus and set out to make my paper version of that sweet watermelon.
Can't you just taste it? Um...makes my mouth water!
Here's how you can make your own...
Using my Circle Scissor Plus, I cut out a circle in Whisper White, and then a circle slightly larger in Certainly Celery. I used a scratch piece of paper and cut a circle just smaller than the Whisper White. I used this as a template to reverse mask the white circle. In the template, I sponged on Melon Mambo (the watermelon flesh). The bite is created with the Scallop Circle punch. The seeds were hand cut out of scrap Basic Black, adhered with 2-way Glue Pen and then covered with Crystal Effects for visual dimension (it's really awesome irl). The sentiments in Basic Black Craft ink are both from the Teeny Tiny Wishes set (can't get enough of this set...I can't get it off my desk). I used the Eyelet Border punch on the panel of Basic Black, Whisper White and a strip of Razzleberry Lemonade DSP. The Melon Mambo Polka Dot ribbon is wrapped just above the DSP strip and it is all adhered to the beautiful Melon Mambo card base. I love how this card turned out. I did fifteen of these and the toughest part was the seeds and waiting for the Crystal Effects to dry. To do just one really takes no time at all.
Adam really wanted me to leave the Whisper White panel off and mount the watermelon right onto the Basic Black. While I had the supplies all out and some extra watermelon slices on my desk, I made him this card.

I love the melon on the black. So, I had to do one more...

This card layout is inspired by the Stamps & Smiles layout (SASSC25) seen HERE over at The Fresh Batch. I lowered the ribbon a bit, it just looked better to me that way. This is the first time I've ever played along but they post up a sketch challenge each week. Hop on over and give it a try. Anyway, the supplies are basically the same with the addition of black brads and the flower, made with the 5-petal flower punch. The flower center is a 1/2" circle with "sweet" stamped in Whisper White craft and then covered with Crystal Effects. Here's a close up...
The C.E. really makes it pop! Do ya like it? I really like this one!! Someone really special is getting this card!!

Thanks for stopping in today! May you find inspiration in life's sweet things too! Check back soon...I just got my order of new goodies and I'll be playing with it all over the weekend. I've already made a masculine card that I post first. I can't wait to put what's in my head onto paper!!! Been dreaming about this for weeks now! See you soon!

Hugs ~Leslee~