Showing posts with label Punches. Show all posts

Wednesday, February 20, 2013

Love You Much

100_5870

     A perfect little anniversary card (or any little love note)…quick, simple and to the point!

     I used the Full Heart punch, one in Pool Party and the other with the More Amore DSP.  The hearts are “tied” together with a button from the SAB Sycamore Street Ribbon & Button pack.  The sentiment is found in the Best of Love set (February’s Best of 25 Years!).  You can take a look at all stamps in this set by clicking here.  The edge was scalloped with the Scallop Edge Border punch.

     Like I said, quick, simple and to the point!  Gotta love it!  Thanks for stopping in.  I hope you’ve been inspired to show some love today :)

Hugs,

Leslee

All supplies can be purchased by clicking the “Shop Now” tab above. 

Thursday, November 22, 2012

Happy Thanksgiving!!

  100_2262

     Happy Thanksgiving!  Here in America, today is the day we set aside to give thanks for all our wonderful blessings.  Along with that comes a feast of turkey and all the trimmings with family and friends.  As always, I am hostess and in charge of the turkey, dressing, gravy, sweet potatoes and fresh rolls.  I’ve asked the rest of the family to fill in with veggies, desserts and whatever their heart desires.  Needless to say, if you go home hungry, it’s your own fault ;) 

     Today, I just want to take this opportunity to tell you how blessed I am to have you in my life.  Whether you are local, across the country or across the “big pond”, you are a blessing to me.  I look forward to posting hopeful inspiration for you and enjoy finding inspiration in your posts as well.  Through our blogging we get to know about each other, cry over the sad stuff, learn from each other and celebrate life’s special moments together.  This wonderful craft we share and the technology we share it on has opened up the world to each of us.  I’m not just thankful for you today, on Thanksgiving, but every day!  And I want you to know it :)  Thank you for being such a wonderful part of my life.  I look forward to sharing more through the years ahead and may God bless you :)

Hugs,

Leslee

Tuesday, November 13, 2012

Fit For A Monarch :)

100_5548 

     I love to include a “little something” in with my stamp club orders each month.  I had picked up these little chocolates…not having a clue as to what to do with them (besides stamp and eat).  Then, as my Black-eyed Susans came into full bloom out back, it came to me….100_5543

     What do you think?  Pretty cute, eh?  Of course they are :)

     I used the 2-3/8” Scallop Circle punch on Daffodil Delight.  Edges lightly sponged in the same color.  Cut between scallops to create petals, spritz with water and crinkle them up.  Adhere the chocolate to top center and add a little butterfly from the Beautiful Wings Embosslits Die.  The stem is simply a pipe cleaner.2012-09-25 07.42.11

     Here was my inspirational photo…

     The butterfly is a male Monarch.  He is only about 12 hours “hatched” at the time of this picture.  He chose to make his chrysalis just outside our front door.  It was on a stamp club night.  In the span of 5 minutes (between two of the club members arriving), he changed from caterpillar to chrysalis.  For two weeks, the boys and I watched him.  Almost two weeks to the hour, he emerged.  It was really an amazing thing to witness :)  You can check out more pictures in sequence below :) 

     Inspiration that prompts creativity can be found everywhere!  Thanks for stopping in and letting me share our story with you.  I hope you’ve been inspired to look around you for today’s inspiration :)

Hugs,

Leslee

From this…100_5475 to this in 5 minutes…2012-09-20 11.46.07

Two weeks later…2012-09-24 13.27.19

Newly “hatched”, wings still curled and wet…2012-09-24 16.18.35

First time to spread his wings (about 2 hrs. old)…2012-09-24 19.07.18[0]

Next morning (12 hrs. old), he let me carry him into the sunshine…2012-09-25 10.32.39

That’s how he ended up on my Black-eyed Susans!  So amazing!  How cool is that?!!   

Wednesday, September 19, 2012

Cool Candy Treats

100_5448100_5457      I made a variety of little candy treats for the vendor fair.  I wanted people to see several different ways of simple packaging. 

     As we all know, it’s all about the presentation!  Don’t those candy corn treats look so very yummy in that cutie of an owl?  The Christmas treats are simply soft mints but the packaging makes it look like the recipient is really getting something grand.  I’ve made these before for my PTA peeps 100_5427and they loved them! 

     Mass production is the key.  The ability to punch out all the components and then assemble makes these treats quick and easy.  Thinking up a design is the most difficult part of it all.  Once that’s done, it’s smooth sailing :)  Of course, you can NEVER go wrong with chocolate!100_5428

     Some of my supplies used:  2-3/8” Scallop Circle, 1-3/4” Scallop Circle, 1-3/8” Circle, 1-1/4” Circle, 3/4” Circle, Word Window punch, Extra Large Oval punch, Peekaboo Frames Bigz L Die, Top Note Die, Perfect Polka Dots Embossing Folder, Red Glimmer Paper, 1” x 8” Cello Bags, Baker’s Twine and various colors of card stock.

100_5450     Thanks for stopping in today.  I hope you’ve been inspired to make a pretty presentation of some sort today :)

Hugs,

Leslee

Monday, July 23, 2012

Making the Cut

 100_5078 

     This one didn’t make the cut for my Open House but I can always use birthday cards :)  I was in play mode.  You know…that time when you just sit down and start “playing” with your new goodies.  See what your own mojo can come up with…or not.  Well, it was certainly an “or not” moment. 

100_5080     I did come up with the medallion which was not put to use on any card prior to my Open House.  I just couldn’t figure how to use it.  The stamp used is in Betsy’s Blossoms.  I stamped it three times in Rich Razzleberry ink.  I then punched it with the 2-3/8” Scallop Circle and then again with the same punch only I turned the punched scallop slightly in the punch the second time.  The second layer used the 1-3/4” Scallop Circle and punched again turning the punched scallop slightly.  This gives the pointy edge to the scallops.  Love when punches pull double duty!  The third and final layer is the large flower from the Boho Blossoms punch.  I finished the card using the Floral District DSP and a bit of Rich Razzleberry Taffeta Ribbon.  I used the same layout as I did for one of the Open House cards, Floral District Happiness. 

     Glad to finally be able to use this layered medallion.  Thanks for stopping in today.  I hope you’ve been inspired. 

Hugs,

Leslee

Supplies can be purchased here.

Friday, July 20, 2012

In-Colorful Butterflies

100_5076

     This was the last super simple project we did at my New Catalog Open House.  I always want to showcase the beautiful new In-Colors and fun new tools that Stampin’ Up! offers.  After all, that’s why I hold a ‘New Catalog Open House’.  ;)  This was a great project to showcase these new goodies. 

     I was inspired by one of the project photos in the new annual catalog.  Check it out on the bottom of page 178.  I love referring to the catalog for ideas…especially when my own mojo decides to take its own vacation. :{   I changed it up ever so slightly to add a few more little sentiments from the Fabulous Phrases set.  The new Papillon Potpourri set (all various butterflies) makes the coordinating Elegant Butterfly punch just such fun to use!  Of course, I set out each of the five new In-Colors (Summer Starfruit, Primrose Petals, Raspberry Ripple, Midnight Muse and Gumball Green) and my guests chose what they wanted to use on their card.  Such fun to see the many differences in colors and sentiments used! 

     I love my job!! :)  If you think you’d love to do what I do, let me know and I’ll help you get started.  Or, you can learn more on my website by clicking Join The Fun.  There’s never been a better time to join the Stampin’ Up! family.  You are never alone and there is inspiration everywhere!  I’d love to have you on my creative team! 

     Thanks for stopping be today.  I hope your inspired. 

Hugs,

Leslee

Supplies can be purchased here.

Friday, May 18, 2012

A First :)

100_4833


100_4828     Our little niece has just celebrated her 1st birthday.  She has such a sweet little personality.  She certainly has us all wrapped around her little finger :) 

     I had only about 30 minutes to throw something together.  What could be easier than the Big Shot and 5-Petal Flower punch?  I can’t think of anything either :)  The flowers are in Melon Mambo, Little Leaves die cut in Garden Green.  The ribbon and flower buttons are from Sale-A-Bration past.  The sentiment is pieced together from Bring On The Cake.  The Perfect Polka Dots texture allows the card base in Whisper White to work with the Whisper White Top Note die.2012-04-08 15.37.11

     Quick, easy and cute…just like my niece!  Here’s a cute picture of her and my baby.  She held his attention almost as long as his favorite video game!  :)  Now that is a first.  Thanks for stopping in today.  

Hugs,

Leslee

Supplies for this card can be purchased here.

Wednesday, April 25, 2012

Easter Bits

100_4671         I know that Easter is long been past but I thought I’d show you a card that I created out of my Bits And Pieces pile.  The yellow tulip was created for a recent project showing how to alter some of our punches to create a different look.  I opted to go with a different color on that project but didn’t have the heart to toss this Daffodil Delight tulip into the trash bin.  Once again, I’m glad I didn’t.  It looks lovely on this Square Lattice textured background with Concord Crush sponging and detail.  The stem and leaves were done freehand using the Cutter Kit.  I love that handy little tool :)

100_4653     I, also, had to make up some of these oh so adorable bunnies.  I used the 1” x 8” Cello bags and filled them with jelly beans.  Then attached the Jelly Bean Prayer to each bunny.  Lots of ews and ahs 100_4652over these punch art bunnies.  If you need a list of the punches used, let me know and I’ll see what I can do :)

     Thanks for stopping in today.  I hope you’ve found some inspiration.  If not for now…perhaps for later :)


Hugs,

Leslee

Supplies can be purchased here.100_4612

Thursday, April 19, 2012

Birthday Smooches

100_4728      I really do like the new Summer Smooches DSP that is available for purchase this month as part of Stampin’ Up! ‘s new catalog product sneak peek promotion.  You can check out all the Summer Smooches on my Promotions Page.  With colors so vibrant and tons of things to coordinate with it, how can you go wrong.  I used the new Daffodil Delight Seam Binding Ribbon on this card.  All the Seam Binding Ribbons are so easy to use thanks to the sheerness and light weight. 

     This card was one of the projects we did at this month’s Stamp Club meeting.  Not only does it show off some of the Summer Smooches products but it teaches the technique for using the Scallop Trim Corner and Scallop Trim Border punches.  There is a technique to creating this beautifully trimmed layer.  It’s one that certainly takes some practice and it is a good technique to teach.  If you’d like to learn how, I’ll be happy to get together with you and your friends and teach you :) 

     I can’t wait to play with more of this pretty paper!  Thanks for stopping in today.  I hope you’ve been inspired get some Summer Smooches of your own :)

Hugs,

Leslee

Supplies can be purchased here.

Wednesday, March 7, 2012

Cherry Thanks

100_4426

     Did you every buy something only to have it sit around for months until you unbury it and ask yourself, “why did I ever buy that?”  I’m sure I am not the only one!  Fess up…we all have those crafty impulse buys.  Well, the Cherry Scented Embossing Powder found in the Occasions Mini Catalog was my latest impulse buy.  I didn’t know what to use it on.  I have no stamp sets with cherries (however Stampin’ Up! does carry several).  So, it sat…untouched…until I came across this card on Mary Fish’s blog, Stampin’ Pretty.  Of course, I put my own spin on it…remember, I own no cherry stamps. 

     Here is what I did…

     I used the new Cherry Scented Embossing Powder to heat emboss a scrap piece of Cherry Cobbler card stock.  Let me just say, it really does smell like cherries.  It holds its scent for about two weeks.  So, if you are going to send it off, send it straight away so the recipient gets the full smell :)  I used my 1” Circle punch to make the “cherries”.  The “stems” are simply two small pieces of Hemp Twine that I knotted together at one end.  The leaf is a petal that I snipped off a 5-Petal Flower punch out.  Really cute cherries and they smell good too!  :)  

     This whole project was so cute, simple and sweet smelling that I decided to use it as a make-n-take.  I just had to share this scented embossing powder with everyone and everyone loved it!  I hope you enjoyed it too.  I encourage you to give one of the new Scented Embossing Powders a try.  It comes in Cherry, Melon and Vanilla.

Hugs,

Leslee

Supply List:  (orders can be placed here)  Cherry Scented Embossing Powder, Heat Tool, Powder Pal, VersaMark Ink, Basic Black classic ink, Sincere Salutations stamp set, Whisper White cs, Pear Pizzazz cs, Cherry Cobbler cs, Twitterpated DSP, Hemp Twine, 1” Circle punch, 5-Petal Flower punch.

Friday, March 2, 2012

Celebrate Sale-A-Bration!

100_4437

     This is not a new idea.  I’ve seen it done all over the internet but I’d been itchin’ to do it with the awesomely gorgeous 100_4438Everyday Enchantment DSP and coordinating Everyday Enchantment Ribbon and Brads package!  It is so yummy together!  Can you tell that I am really liking this paper?  You might think that I haven’t ventured any further back in the Sale-A-Bration catalog.  Well, you’d be wrong.  I flipped two pages and found the lovely Outlined Occasions stamp set :)  A perfect compliment to these adorable presents! :)  I colored the sentiment in with coordinating markers.  The card base is Very Vanilla and the sentiment strip is Pool Party.  Presents are punched with the 1-3/8” Square punch.  I would like to point out that the present bows (not the ribbons) are made using the Blossom Bouquet Triple Layer punch.  Yet another use for our wonderful punches :)

     Thanks for stopping in today.  I’ll be working on an email subscription for my sidebar.  Just for Andrea :)…but anyone is welcome to use it.  I pray I won’t mess things up too terribly bad.  Fingers crossed.  I hope you have a blessed day and get your fingers inky!

     Sale-A-Bration lasts only until the end of this month!  There is still time to book a party and earn some free goodies?  This is the only time you’ll be able to get the DSP, ribbon & brads and the stamp set that I’ve used here today!  Don’t let a good thing pass you by.  Call today to schedule :)

Hugs,

Leslee

Friday, February 24, 2012

Wonderful Enchantment

100_4326


100_4331     This is the second project we did at stamp club this month.  I told you that I was in a paper flower mood.  What better project for my clubs to do?  These rolled paper flowers are so much fun!  Again, the point of this month’s club was to show additional ways to use our punches…besides the obvious.  You can find tutorials on these rolled flowers all over the internet.  My advice?  Just try it and then try it again!  The more you make these cuties, the easier they are to make :)  You’ll be a pro in no time!  And remember…it is just paper! 

     In this case, one 2-3/8” Scallop Circle punch with a 1-3/8” Circle punched out of the middle (the circle was peeled apart and then used to create the little flower buds).  The 5-Petal Flower punch was used for the base (the leaves).  These, I curled up for visual interest.  Again, I picked these colors right out of the lovely Everyday Enchantment DSP.  I just can’t get enough of it! :)

     I love the clean look to this card and the elegance that the flowers give it!  Thanks for stopping in today.  I hope you’ve been inspired to create a paper flower (or two) for today’s craft project. 

Hugs,

Leslee

Supply List:  Very Vanilla, Pool Party, Calypso Coral, Peach Parfait, Lucky Limeade cs, Everyday Enchantment DSP (SAB FREE), Loving Thoughts stamp set, Basic Black ink, 2-3/8” Scallop Circle, 1-3/8” Circle, 5-Petal Flower punches, Bone Folder, Big Shot, Beautiful Wings embosslits die, Little Leaves sizzlits die, Jewel Basic – Pearls, Tombow Multipurpose Glue, Mini Glue Dots, Dimensionals

All supplies are Stampin’ Up! and can be purchased here.

Thursday, February 23, 2012

Punched Tulip

100_4342


100_4345     Now that all my stamp clubs have met for this month, I can show you the projects that we made.  I’ve been in a paper flower kind of mood.  I guess that I’m ready for spring and warm sunshine.  Also, I think that the lovely Everyday Enchantment DSP has something to do with the fresh and vivid colors that I am so looking forward to seeing :)  I LOVE this paper! 

     This card is a recreation of one I had done awhile back.  You can check it out here.  The whole point of this month’s projects was to show that you can use the punches in different ways.  Ways other than the obvious.  You can create a totally different look simply by re-inserting the punched shape.  For the tulip petal, I used the Wide Oval punch and then re-inserted it with a slight angle.  Thus creating a point on the one end whilst maintaining the 100_4336opposite rounded end.  The flower stem and leaves were done free-hand using the Cutter Kit (some ladies opted to just use the paper snips).  We sponged the flower edges for extra visual dimension and used Dimensionals between each tulip petal.  The 1” Square punch was used to “flag” the end of the sentiment strip.  The sentiment from Teeny Tiny Wishes is a perfect fit for this narrow strip.  The card is a Z-fold with the front flap secured down. 

     I love this project!  Tulips always remind me of my mom :)  Tulips generally bloom just in time for her birthday!  Which isn’t until mid-April.  So, I think I’m really trying to rush the season!  Well, I’ll just have to continue creating beautiful little flowers out of paper for now :)  Thanks for stopping by.  Let me know what you think.  I love to read your comments.  If you have any questions on how-to, I’ll be happy to answer those as well.  I hope you’ve been inspired to invite a little sunshine into your craft project today :)

Hugs,

Leslee

Supply List:  Everyday Enchantment DSP (SAB FREE!), Pool Party, Calypso Coral, Pear Pizzazz & Very Vanilla cs, Cutter Kit, 1” Square punch, Wide Oval punch, Scallop Trim Border punch, sponges, Basic Black, Pear Pizzazz & Calypso Coral inks, Teeny Tiny Wishes stamp set, Dimensionals

Supplies are Stampin’ Up! and can be purchased here.

Monday, February 13, 2012

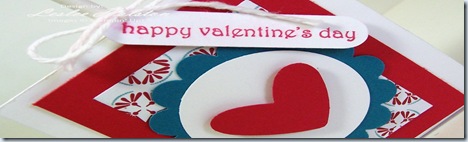
Classroom Valentine’s Day Treats

100_4399     Valentine’s Day is the sweetest excuse to create cute little treats!  Like we need excuses…right?  Of course, I don’t just stop with the classroom, I also have to do a little something for the ladies I work with in the PTA.  Therefore, I’m always on the lookout for something that can be mass produced…quick and easy! 

100_4389     I’ve seen these adorable lollipop treat holders around for years.  I never even looked for a tutorial but came up with my measurements simply by measuring the height and width of 100_4371my lollipop.  The Simply Scored tool made really quick work of the task of scoring.  I could score the entire length of a sheet of card stock and then cut it down to the individual widths I needed.  It worked out real nice!  
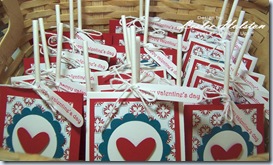
100_4374     As with any mass produced project, I like to cut, prep and punch all the pieces and parts I will need to complete my project.  It may seem a bit of a mess but it is an organized mess and can be easily thrown into a baggie or basket to set aside for later assembly. 

100_4383     I had to make a little something special for the classroom teacher as well.  She will receive the altered yogurt cup.  Yes, you read that right!  This was a yogurt cup with the lid that contains granola crunchies.  Wish I could just come out and tell you which one but I know you’ll know the ones I’m talking about :)  (If you really want to know, you can call me.)  It makes a lovely 100_4378altered container and holds some yummy chocolates just for teacher or any other special person in your life :)  The lid is decorated to match with the classroom treats.

     Adam addressed and signed the back of each treat holder.  They are all ready to be delivered to his classroom friends.  I’m sure they will love them!  My PTA friends loved theirs :)  Who wouldn’t love a little something sweet?100_4410
     Thanks for stopping in today.  I love to hear what you think.  Comments are always welcome.  It helps me to grow and know what you may be looking for by way of inspiration.  I hope you always leave my blog with a little inspiration to get you creating :)  Happy Valentine’s Day to you and yours!

Hugs,

Leslee

100_4403Supply List (All supplies are Stampin’ Up! and can be purchased here.)

Whisper White, Real Red, Island Indigo and Twitterpated DSP; Teeny Tiny Wishes stamp set; Simply Scored; Heart to Heart punch, 1 3/8” Circle punch, Scallop Circle punch, Word Window punch; White Baker’s Twine; Dimensionals & Snail

Sunday, February 12, 2012

Valentine Project

 100_4353

     I was recently invited to do a craft project at a sweet young lady’s 13th birthday party.  She had a few friends over to stay the night and thought that a crafty project would be fun to do.  She was right!  It was a lot of fun!  We shared quite a few laughs.  This was the project that we did.  A sweet little Valentine card with coordinating altered 100_4368envelope and pillow box (of course, with chocolates) :)  It was lots of fun designing for 13 year old girls.  I don’t get to do that often.  All I could think of was glitter…and glitter and glue everywhere!  Ah, but that wasn’t the case at all.  I pulled out the Red Glimmer Paper.  Love this stuff!  No mess, no fuss, no clean up!  Perfect!  This paper holds a nice curl too!  Simply twirl it around a wooden skewer or piercing tool.  Don’t try to curl it like you would curling ribbon.  You know, pull it along a pair of scissors.  Nope…glitter will fly everywhere.  I know because I tried it.  I won’t go into detail on the how-to but I will give you the supply list.  If you have questions, just drop me an email.

     The girls seemed to enjoy the projects.  We did have a nice time.  I was so honored to be asked to share with these young ladies (many whom I’ve known since they were in 1st grade).  Thanks for having me, Karen (and Tricia).  I’ll be happy to do it again anytime :)

     And thank you for stopping by today.  I hope you’ve been inspired to give your Glimmer Paper a twirl :)

Hugs,

Leslee

Supply list (all supplies are Stampin’ Up! and can be purchased here):

Whisper White, Real Red card stock, Twitterpated DSP, Red Glimmer Paper, Basic Black Classic Ink, Word Play stamp, Big Shot, Pillow Box die, Adorning Accents Textured Impressions Embossing folder, Adorning Accents Edgelits die, Hearts Collection – Framelits die, Scallop Circle punch, Small Heart punch, Heart T0 Heart punch, Real Red 1/4” grosgrain ribbon, Whisper White Medium envelope, Clear Window sheet

Friday, February 10, 2012

Bordering Romance Thanks

100_4284

     Are you tired of seeing the Everyday Enchantment DSP yet?  Good!  Because I can’t get away from using it.  Every now and again, a paper will come along that is just like that.  I really love, love, love this 100_4280paper!

     I demonstrated the super quick card at my workshop.  The sweet little nugget holder was a Make-N-Take for the guests.  These can be easily mass produced with the Simply Scored tool :)  They loved it!  I100_4290 love coordinating projects.  This versatile paper allows you to do that effortlessly :)  I won’t bore you with card details.  They are pretty straight forward.  I do want to point out that the card base with the DSP and ribbon treatment could very easily be turned on the horizontal.  I deliberated over the base direction for quite some time before finally settling on this.  Either direction was really nice looking :)   

     I’m so glad you stopped by today.  Thanks!  And I hope you have been inspired to coordinate today’s project. :)

Hugs,

Leslee

Supplies are Stampin’ Up! and can be purchased here.

Stamps: Bordering On Romance, Kindness Matters, Teeny Tiny Wishes; Paper:  Pool Party, Lucky Limeade & Very Vanilla cs, Everyday Enchantment DSP (FREE through Sale-A-Bration); Ink:  Lucky Limeade & Pools Party markers; Accessories: Pool Party ruffled ribbon, Lucky Limeade 1/8” Organdy ribbon (SAB), Large Tag punch, Tag punch, 1/8” circle punch, Word Window punch

Friday, February 3, 2012

Bordering Accents

     I am really loving these fresh In-colors…Pool Party & Calypso Coral.  Throw in the lovely Everyday Enchantment DSP from the Sale-A-Bration brochure and these colors have taken on new life.  I really hadn’t touched these In-colors until now. 

100_4244     The Adorning Accents Edgelits die coordinates so perfectly with the dotted border from Bordering On Romance.  Can you tell what the vase is?  That’s right…I used the Ornament punch with the point cut off!  Great way to get more use out of a seemingly seasonal item!  The sentiment is stamped in Early Espresso on Very Vanilla with a sentiment from Bring On The Cake.  The entire card (sentiment panel and inside layer too) were sponged with Soft Suede to give it a softer look.

     This card was made with a very special lady in mind…my aunt! :)  She had recently celebrated her 76th birthday.  It’s been a difficult year for her.  Here’s wishing this year will be so much better!  I love you, Althea! 

     Thanks for stopping in today.  I hope you’ve been inspired to give your punches some new purpose :)

Hugs,

Leslee

Supplies are Stampin’ Up! and can be purchased here.

Friday, January 20, 2012

Bordering On Romance

 100_4229


     This is such an elegant one layer card that we did at this month’s Stamp Clubs.  The floral image is from the new Bordering On Romance set.  I stamped it in Jet Black StazOn ink and used my Aqua Painter to color it in with Classic Marina Mist, Baja Breeze, Pear Pizzazz and Craft Whisper White.  The sentiment is from Bring On The Cake, stamped in Soft Suede.  I wished I used Early Espresso instead…it would have showed up better, in my opinion.  The butterflies simply are a folded piece of Blushing Bride that I punched with the Small Heart punch.  I love being able to think outside of the box and get double the use with my supplies :)  The card base is Baja Breeze.  I used the new Adorning Accents Edgelits Die and the new coordinating Adorning Accents Textured Impressions Embossing Folder (now that’s a mouthful).  I, 100_4231also, ran the inside edge through the Big Shot with the hearts folder in the Adorning Accents TIEF set.  I then sponged the edges of all with Soft Suede to give it an aged look.  Love it!!

     Quick tip --  When using the Edgelits Dies, secure the wafer-thin die to the card stock using a sticky note.  Stampin’ Up! suggests using Dotto but, since I don’t have any, I had to come up with something else to temporarily hold the die in place.  Without it, the dies would have a tendency to slip when I ran it through the Big Shot. :(  I tried SNAIL, Tombow Multipurpose glue and the 2-Way Glue pen…all to no avail.  The sticky notes work great, are thin enough to not effect the cut in anyway and will lift off without messing up the card stock.

     Thanks for popping in today.  I hope you’ve been inspired to give these new dies and folders a try.

Hugs,

Leslee

Supplies are Stampin’ Up! and can be purchased here.